

What Photo Resizer is used for – 12 practical recipes
Ready-made settings for the most common tasks with the free batch editor UtilStudio Photo Resizer. Each recipe is a preset: set it up once, then just drop photos on it – or let it run in the background.
Free for Windows 10 and Windows 11 (64-bit). Everything runs offline on your computer.

Recipes on this page
- How to shrink photos for e-mail to under 500 KB
- How to convert iPhone HEIC photos to JPG in bulk
- How to make e-shop product photos with a white background
- How to resize photos for Instagram (1080 × 1350)
- How to watermark a whole photo shoot
- How to remove the GPS location from photos before posting them online
- How to put many photos into one PDF (for an office, insurance or client)
- How to rename photos by the date taken
- How to resize new photos automatically in the background
- How to shrink a screenshot with one shortcut (Ctrl+Alt+R)
- How to prepare photos for a website and upload them via SFTP
- How to prepare real estate photos for a listing portal
The values are examples – change the size, quality or texts to suit you. Settings that are not mentioned can stay at their defaults.
How to shrink photos for e-mail to under 500 KB
In short: Create an E-mail preset with the size limited to 1600 × 1600 px and a maximum file size of 500 KB. Photo Resizer finds the highest JPG quality that fits the limit, so a 5–8 MB phone photo becomes a file of a few hundred KB.
Preset settings
- Resize – fit inside 1600 × 1600 px (portrait and landscape photos keep their ratio).
- Target – turn on Max. file size JPG/PNG/WebP (KB) and enter 500.
- Target type – E-mail: send via SMTP or open a new message in your e-mail program (classic Outlook, Thunderbird, eM Client) with the photos attached. Or keep a folder and attach the photos yourself.
- Drop the photos on the preset.
Result: Every photo is at most 1600 px on the long side and under 500 KB; the log shows the new size of each file. Twenty photos fit comfortably into one e-mail.
How to convert iPhone HEIC photos to JPG in bulk
In short: Set the target image format to JPG and drop the HEIC files on the preset. Photo Resizer reads HEIC/HEIF through the Windows codec and saves standard JPG files that open everywhere.
Preset settings
- Target – target image format JPG, quality 85–90 %.
- Optionally Resize – e.g. fit inside 2048 × 2048 px to make the files smaller.
- Optionally Remove GPS location from kept EXIF before sharing.
- Choose the folder with the iPhone photos (Choose photos, file mask
*.heic;*.heif) or drag them in.
Result: JPG copies of all photos; the originals stay untouched. If Windows has no HEIF codec, the program says which free extension to install from the Microsoft Store. RAW (CR2, NEF, ARW, DNG…) and AVIF work the same way.
How to make e-shop product photos with a white background
In short: Use AI background removal with a white background and crop to a square, e.g. 1200 × 1200 px. The AI runs offline on your computer – product photos are never uploaded anywhere.
Preset settings
- AI adjustments – Remove background, new background Colour = white, quality Fast (U²-Netp) or the more precise IS-Net.
- Resize – Fill the size and crop the rest, 1200 × 1200 px.
- Rename – e.g.
product-[#SequenceNumber,{0:d4}]→ product-0001.jpg. - Target – a folder, or upload straight to the shop server via FTP/SFTP.
Result: Uniform square product photos on white with SEO-friendly names. In our example a 2400 × 1800 px photo of 225 KB became a 1200 × 1200 px photo of 41 KB.
How to resize photos for Instagram (1080 × 1350)
In short: Use the mode Fill the size and crop the rest with 1080 × 1350 px – the portrait format that takes the most space in the feed. The photo is cropped from the centre to the exact size.
Preset settings
- Resize – Fill the size and crop the rest, 1080 × 1350 px (square post: 1080 × 1080, the newer 3:4 format: 1080 × 1440, story/reel: 1080 × 1920).
- Adjustments – Auto contrast and Sharpen about 30 for a crisper look after downsizing.
- Target – JPG quality 90 %; keep a folder or use Share to send the photos on via WhatsApp or Nearby Share.
Result: Photos with the exact size Instagram expects – no automatic cropping or blurry recompression by the app.
How to watermark a whole photo shoot
In short: Add a text or logo watermark to the preset; the text can include EXIF values such as the date taken. Combine it with a smaller size for web previews and a ZIP archive for the client.
Preset settings
- Watermark – text, e.g.
© Jane Doe, position bottom right; or a PNG logo. - Resize – fit inside 2048 × 2048 px for previews.
- Target type – ZIP archive: all photos of the run in one file named e.g.
shoot-{date}.zip.
Result: A single ZIP with watermarked previews, ready to send via a file-transfer service or upload to a gallery.
How to remove the GPS location from photos before posting them online
In short: Turn on Remove GPS location from kept EXIF. The camera data (date, exposure, camera model) stays, only the location is removed – so nobody can see where the photo was taken, for example at your home.
Preset settings
- Target – Keep Exif data on, Remove GPS location from kept EXIF on. To drop all EXIF data, turn off Keep Exif data.
- Optionally Resize to 1920 px for the web.
- Drop the photos on the preset before uploading them to a marketplace, forum or social network.
Result: Copies without location data; the original photos with GPS stay in your archive.
How to put many photos into one PDF (for an office, insurance or client)
In short: Choose the target PDF document. Each photo goes on its own page – A4, Letter or the size of the photo – and JPG photos are inserted without loss of quality.
Preset settings
- Resize – fit inside 1600 × 1600 px to keep the PDF small enough for e-mail.
- Target type – PDF document, page size A4, file name e.g.
damage-{date}.pdf, open the file when finished. - Select the photos in the order you want and start.
Result: One PDF with one photo per page – ideal for an insurance claim, a building authority, a construction log or a property report.
How to rename photos by the date taken
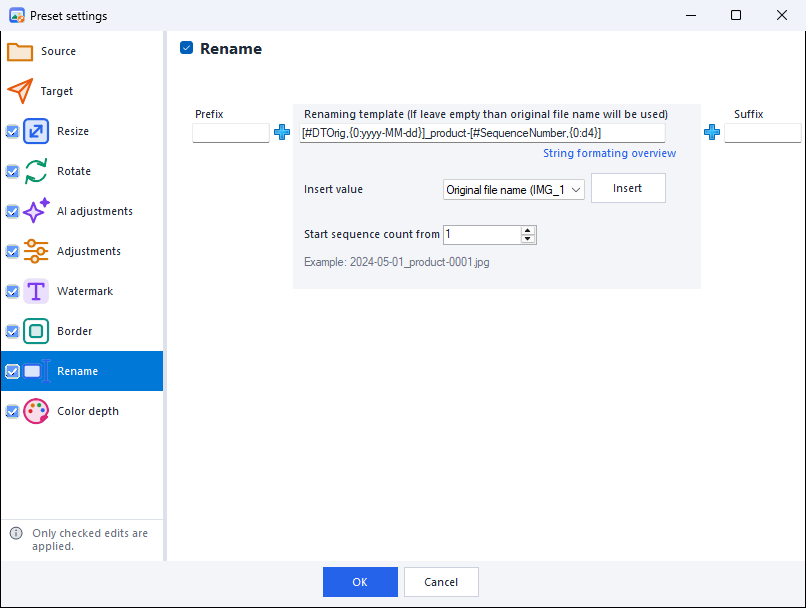
In short: In Rename insert the values Date taken, Folder name and Counter with zeros from the list. An example of the new name is shown right under the template.
Preset settings
- Rename – template
[#DTOrig,{0:yyyy-MM-dd}]_[#OriginalFolderName]-[#SequenceNumber,{0:d4}](you insert the values from the list, no need to type them). - Check the example under the template, e.g. 2024-05-01_Holiday 2024-0001.jpg.
- Turn off Resize if you only want to rename; choose a target folder.
Result: Photos from several phones and cameras sort chronologically by name. You can also use the camera model, lens, ISO or the original name.
How to resize new photos automatically in the background
In short: Turn on processing of new files in the source folder and let Photo Resizer start with Windows as an icon in the notification area. Every photo that appears in the folder is edited and saved to the target – without opening any window.
Preset settings
- Source – the watched folder (e.g. a scanner folder, the OneDrive camera roll or a shared network folder) and turn on automatic processing of new files.
- Set the edits and the target as usual (e.g. 1920 px, no GPS, to the website via SFTP).
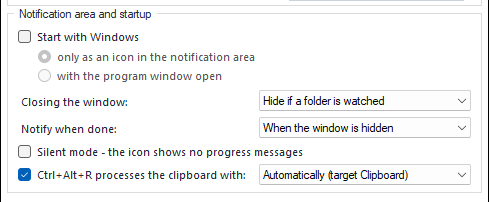
- In the program Settings turn on Start with Windows – only as an icon in the notification area; closing the window hides the program when a folder is watched.
- Choose whether to get a notification when a recipe finishes; the icon shows progress and a red mark on error.
Result: A hands-free pipeline: drop or scan a photo – moments later the edited copy is on the server or in the target folder. Folder watching can be paused from the icon menu.
How to shrink a screenshot with one shortcut (Ctrl+Alt+R)
In short: Take a screenshot (Win+Shift+S), press Ctrl+Alt+R and paste the result. Photo Resizer processes the clipboard with the chosen preset and puts the smaller image back into the clipboard – the window does not even open.
Preset settings
- Create a preset with the target type Clipboard, e.g. fit inside 1280 × 1280 px, JPG 85 %.
- In the program Settings keep Ctrl+Alt+R processes the clipboard with on – Automatically picks the preset with the Clipboard target.
- Copy an image or files in File Explorer, press Ctrl+Alt+R and paste (Ctrl+V) into a chat, e-mail or ticket.
Result: Screenshots and photos small enough for Teams, Slack, a helpdesk ticket or a web form – in two keystrokes. The icon menu also offers Process clipboard with for any other preset.
How to prepare photos for a website and upload them via SFTP
In short: Convert the photos to WebP at 1920 px and let the preset upload them straight to your web server via FTP, FTPS or SFTP (also with SSH keys).
Preset settings
- Resize – fit inside 1920 × 1920 px (or 1200 px for blog content).
- Target – target image format WebP, quality 80 %; remove GPS.
- Target type – FTP / SFTP server, the upload folder, e.g.
/wwwroot/images/blog/. - Optionally Rename to lowercase SEO names, e.g.
kitchen-renovation-[#SequenceNumber,{0:d2}].
Result: Light, fast-loading images on the server without a separate FTP program – good for page speed and SEO.
How to prepare real estate photos for a listing portal
In short: Resize to the size the portal expects (typically 1920 px), improve contrast, remove GPS and pack everything into one ZIP for the portal or the client.
Preset settings
- Resize – fit inside 1920 × 1920 px.
- Adjustments – Auto contrast, brightness +10 for darker interiors.
- Target – remove the GPS location (the address is published by you, not by the photo).
- Target type – ZIP archive or a folder; for a printed offer use PDF document.
Result: Consistent, bright listing photos in the right size within seconds – for every new property with the same preset.
Frequently asked questions
How do I reduce the size of many photos at once in Windows?
Install the free UtilStudio Photo Resizer, create a preset with the size (e.g. 1600 px) or a maximum file size (e.g. 500 KB) and drop all photos on it. The whole folder is processed in one run, the originals stay untouched.
How can I convert HEIC to JPG on Windows for free?
In Photo Resizer set the target image format to JPG and drop the HEIC photos on the preset. HEIC is read through the Windows HEIF codec; if it is missing, the program tells you which extension to install from the Microsoft Store.
Can Photo Resizer run in the background?
Yes. It can start with Windows only as an icon in the notification area, watch folders and process new photos automatically. The icon shows progress, can notify you when a recipe finishes and offers a menu with all presets.
What does Ctrl+Alt+R do in Photo Resizer?
It processes the content of the clipboard – a screenshot or files copied in File Explorer – with the chosen preset, without opening the window. With the Clipboard target the result is back in the clipboard, ready to paste.
Are photos uploaded anywhere during processing?
No. All edits including AI background removal run locally. Photos go only to the target you set yourself – a folder, your FTP/SFTP server or your e-mail.
Download UtilStudio Photo Resizer free
Free for Windows 10 and Windows 11 (64-bit). Everything runs offline on your computer.