

Envelomat 2 – guides
How to print envelopes, labels and mail-merge letters, load addresses from Excel, design an envelope with your logo and transfer data from Envelomat 1.x. Each guide has a few steps and a screenshot.
Envelomat 2 for Windows 10 and Windows 11 (64-bit).
Contents
- Installation and first start
- Upgrade from Envelomat 1.x – transfer addresses and templates
- Import addresses from Excel, CSV or the clipboard
- Address check and company lookup
- Printing envelopes step by step
- Printing address labels and partly used sheets
- Mail-merge letters for window envelopes
- Envelope with your company logo (sender logo)
- QR code on an envelope, letter and label (Enterprise)
- Your own envelope with an image or QR code
- Address groups and continuing an interrupted print
- One address book for the whole office (Enterprise)
- Users and permissions (Enterprise)
- Returned mail and undeliverable addresses
- Licence activation
Every feature is described in detail in the help (F1 in the program).
Installation and first start
- Download the installer and run it. The installer is signed by UtilStudio, s.r.o.; if .NET Framework 4.8 is missing, it is installed automatically.
- Envelomat 2 starts in the language of Windows (English, Slovak or Czech). Change it in Settings → Program language.
- Without a licence the 30-day trial runs with all features. The remaining days are shown at the bottom left.
- If Envelomat 1.x is installed, the home page offers the data transfer right away – see the next guide.
Envelomat 2 is installed next to Envelomat 1.x; the old program is neither changed nor uninstalled.
Upgrade from Envelomat 1.x – transfer addresses and templates
- Start Envelomat 2. If it finds Envelomat 1.x data, the Home page shows We found data from Envelomat 1.x – click Import data.
- Later you find the same in Settings → Data transfer from Envelomat 1.x. A database from another computer is selected with Choose .FDB file… – on a new computer just copy the file ENVELOMAT.FDB, Envelomat 1.x does not have to be installed there.
- Addresses, senders, groups, custom envelope templates, custom label formats and field names are transferred. Repeating the import does not create duplicates.
- The licence is not transferred: Envelomat 2 has its own licence. Owners of a 1.x licence buy it at a discount – the program shows your 1.x licence number on the home page.
Mail-merge documents (FastReport) of Envelomat 1.x are not transferred – create them in the designer as a letter.
Import addresses from Excel, CSV or the clipboard
- In the Address book click Import and choose a file: Excel (.xlsx), LibreOffice (.ods), CSV or vCard (.vcf). Excel does not need to be installed.
- Addresses copied from Excel, Word, a web page or an e-mail are inserted with Import → Paste from clipboard (Ctrl+Shift+V) – even addresses written as plain text are recognised.
- Envelomat maps the columns (Name, Street, Postal code, City, Country…) by their names and AI can complete the suggestion. Check the mapping – the next import of the same file remembers it.
- Choose a group, whether to skip addresses that are already in the address book and whether to mark the imported addresses for printing. Click Import.
The AI service only receives the column names and the shape of the values (e.g. 999 99, Aaaaa), never names or addresses. Switch it off in Settings → Artificial intelligence (AI).
Address check and company lookup
- Envelomat checks every address while you type: a missing postal code, city or street, a malformed postal code and a missing country for a foreign postal code are shown below the fields with a one-click fix.
- To check the whole address book use ⋯ → Check addresses – the To check filter then shows only the addresses with a real problem.
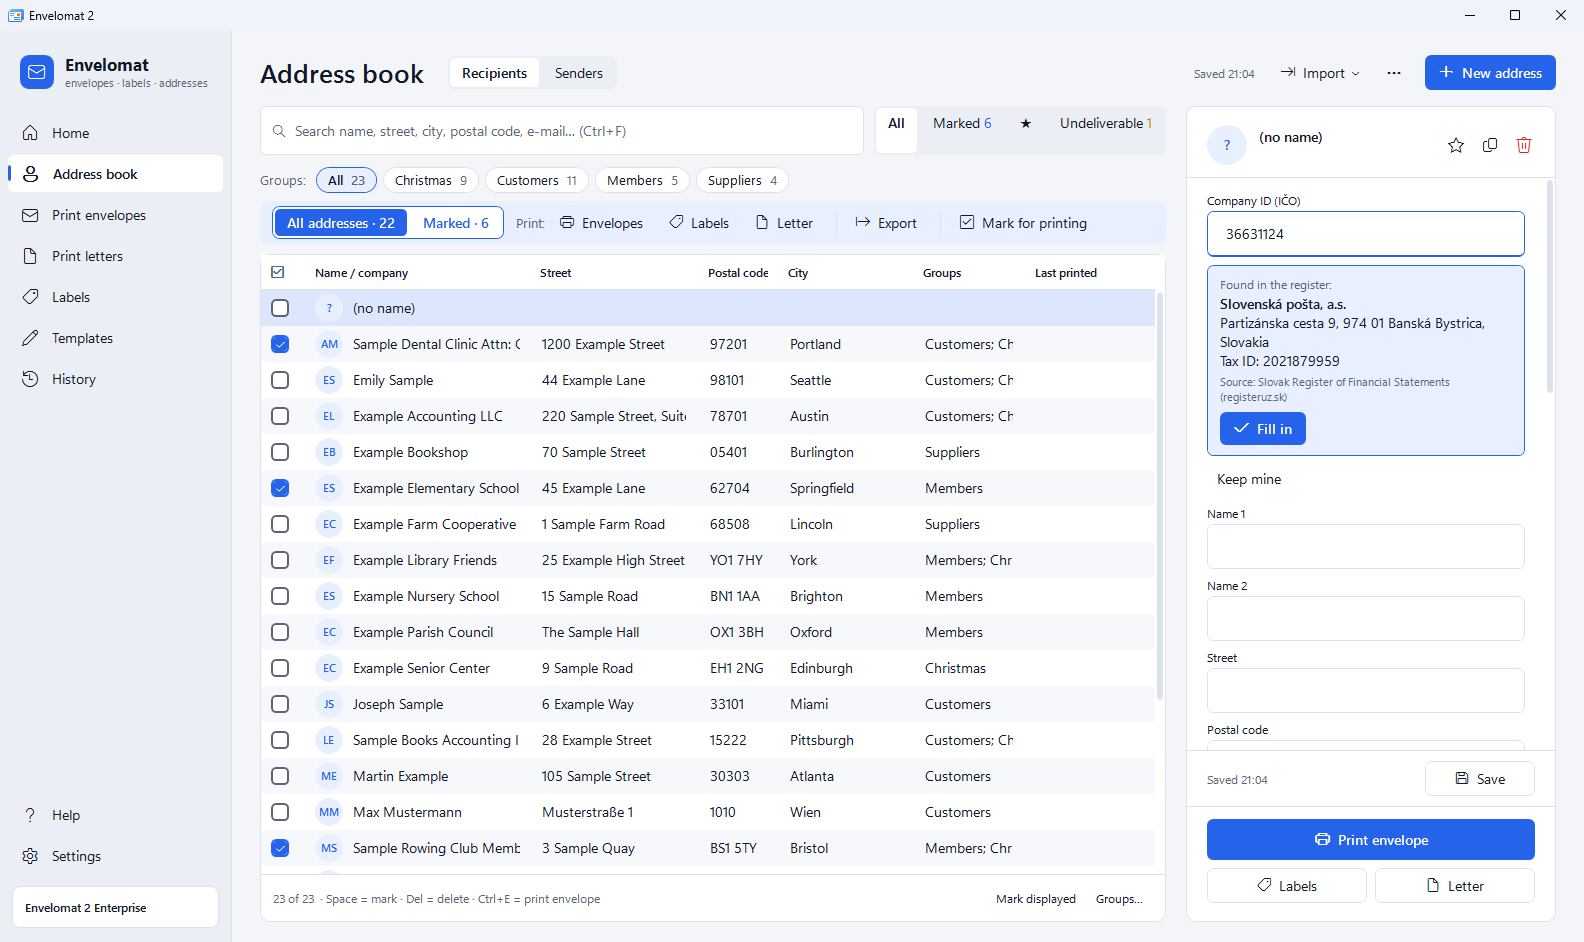
- For Slovak and Czech companies type the 8-digit company ID into the Company ID (IČO) field. Found in the register shows the name, address and tax ID – click Fill in.
The address check runs offline. Only the typed company ID is sent to the public register (registeruz.sk, ARES), never names or addresses. Switch the lookup off in Settings → Address check and completion.
Printing envelopes step by step
- In the Address book mark the recipients (tick box or space bar) or choose a group.
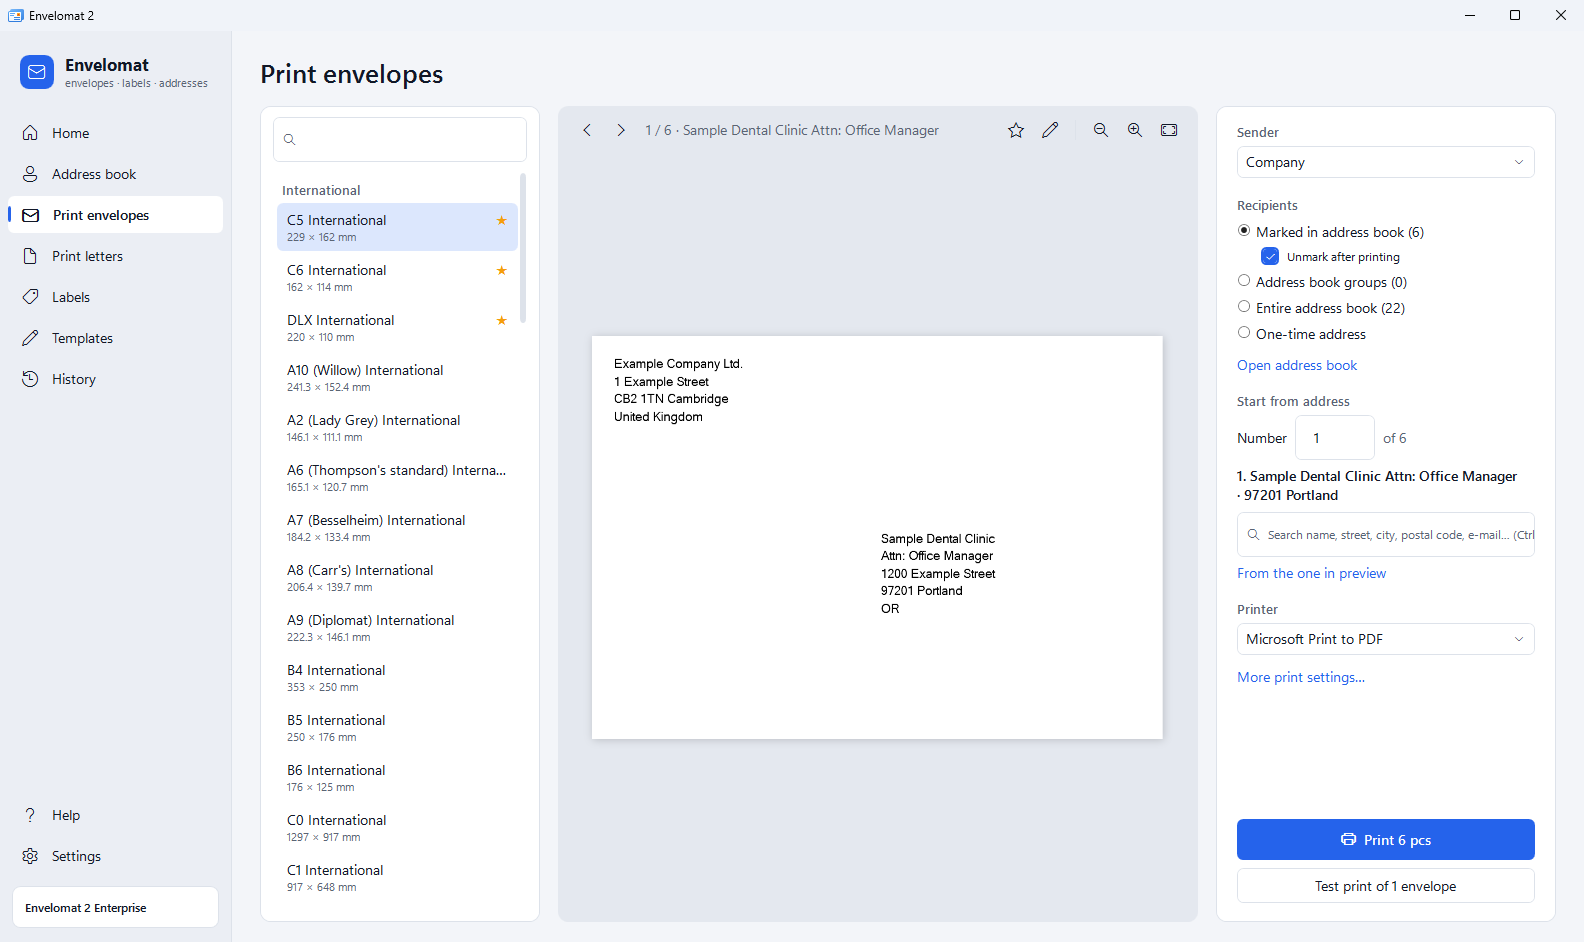
- Open Print envelopes (Ctrl+P). On the left choose a template – the envelope size (DL, C5, #10…). Favourite templates are at the top.
- On the right choose the sender and the recipients: Marked in address book, Address book groups, Entire address book or a One-time address that is not saved. Use the arrows above the preview to browse the envelopes.
- Click Test print of 1 envelope. If the text is off, enter an offset in mm in More print settings… (positive = right / down) – it is remembered for each printer.
- Click Print. After printing the marks are cleared (can be restored) and the job is saved in the History.
Printing address labels and partly used sheets
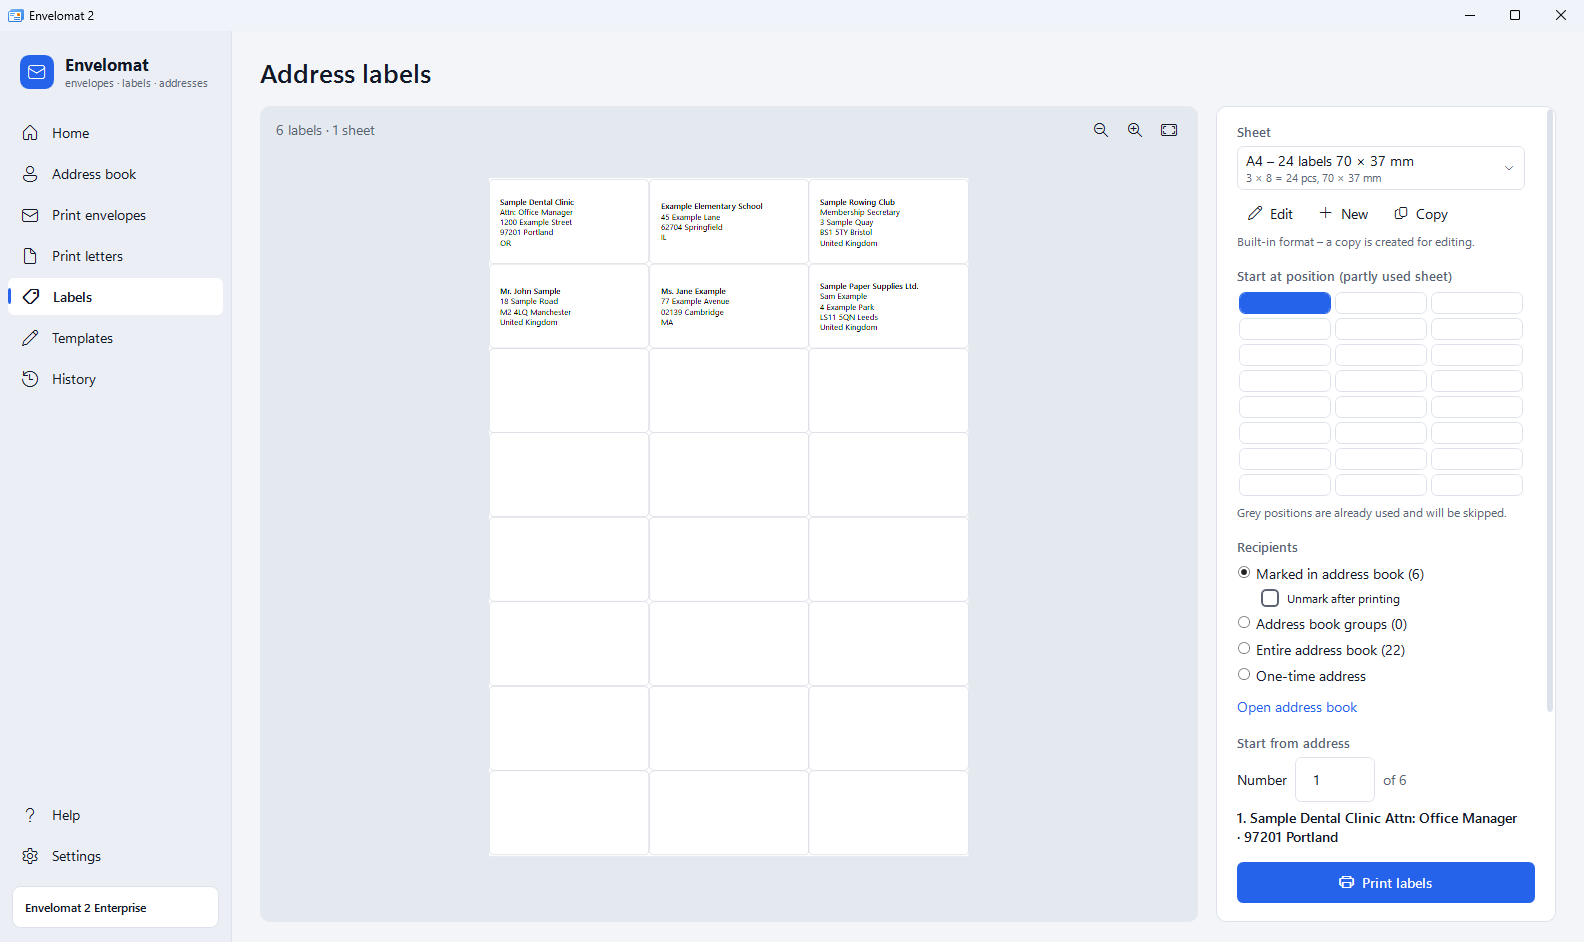
- Open Labels and choose a sheet, e.g. A4 – 24 labels 70 × 37 mm. 11 common formats and 17 formats from Envelomat 1.x are included.
- If part of the sheet is already used, click the first free label in Start at position (partly used sheet) – used positions are skipped.
- Choose the recipients as for envelopes and click Print labels. If the sheet is not finished, Envelomat offers to continue next time at the following position.
- Create your own format (paper and label size, margins, gaps, font, label lines) with New or Copy. Supplied formats never change – you edit a copy.
Mail-merge letters for window envelopes
- In Templates click New and choose Letter. The A4 sample letter places the address exactly in the envelope window (DIN 5008).
- Insert address fields into the letter text with Insert field, e.g. {Recipient: Name 1} – each recipient's data is filled in when printing. The Salutation field inserts an automatic salutation from the name and title (e.g. Dear Mr Novak,); enter your own in the address editor in Salutation in letters.
- Open Print letters, choose the template, sender and recipients and print – one letter per recipient.
Envelope with your company logo (sender logo)
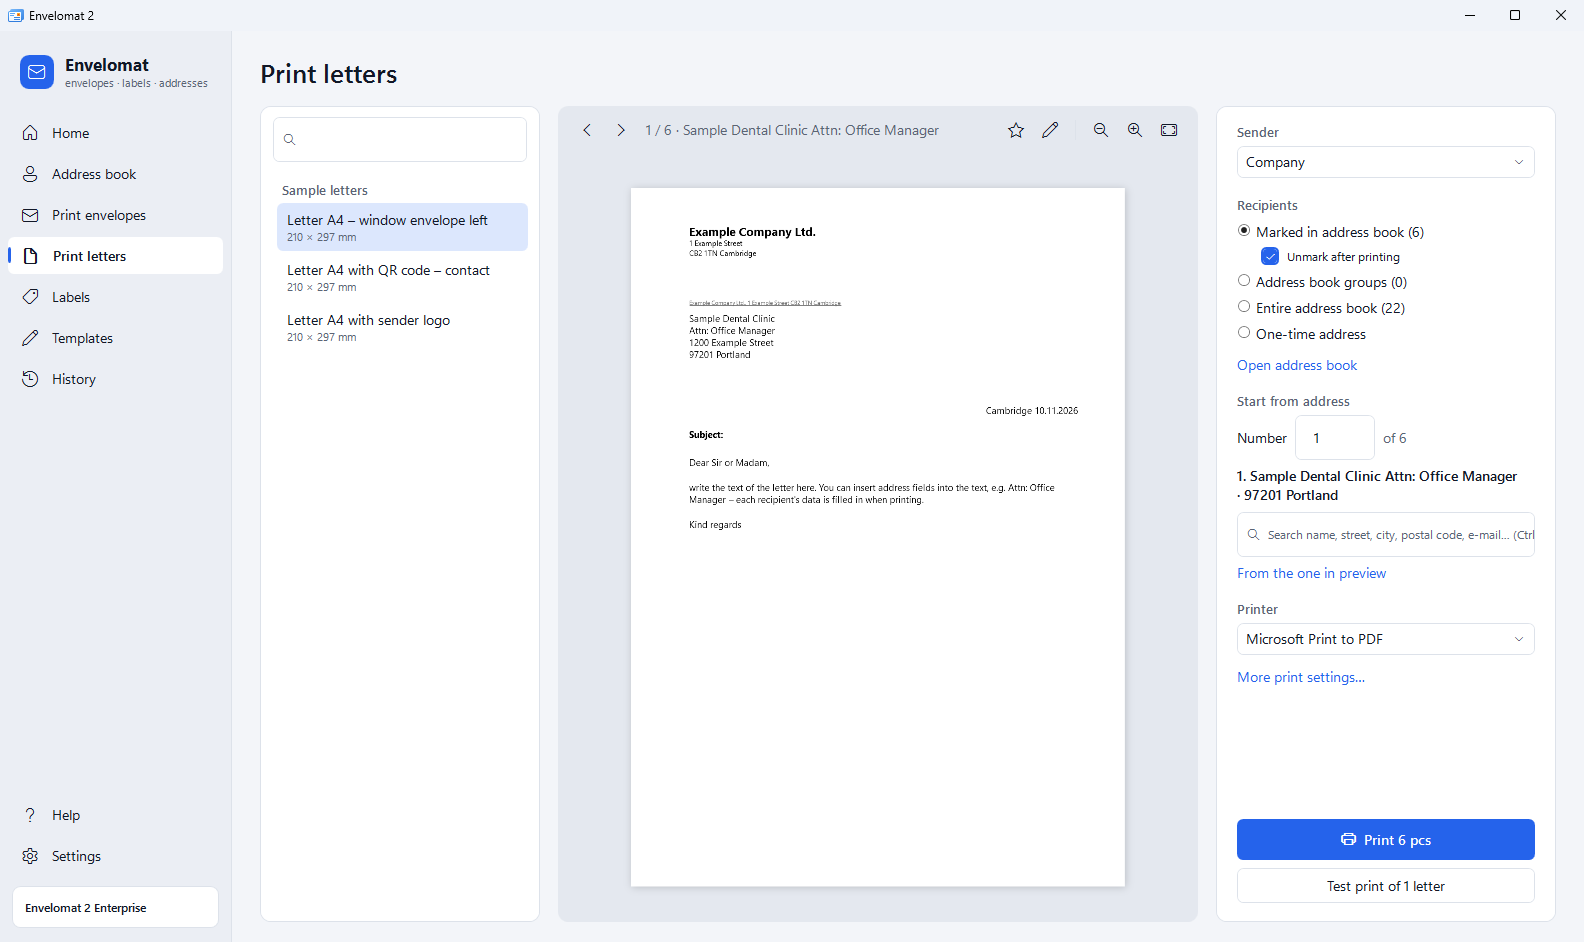
- In the Address book switch to Senders and select the sender (your company).
- Below the sender name click Choose logo… and pick a PNG or JPG image (600 px wide is enough, a transparent PNG background stays transparent). The logo is saved automatically; Remove logo deletes it.
- In Print envelopes choose a template from the group With sender logo – DL, C4, C5, C6 or C6/5. For letters there is Letter A4 with sender logo.
- Choose the sender on the right – the preview shows its logo. A sender without a logo is printed without one, so one template serves all your companies or branches.
Logo elsewhere on the envelope: in the template designer choose Logo ▾ → Sender logo (from Address book), place the frame and set the Alignment.
QR code on an envelope, letter and label (Enterprise)
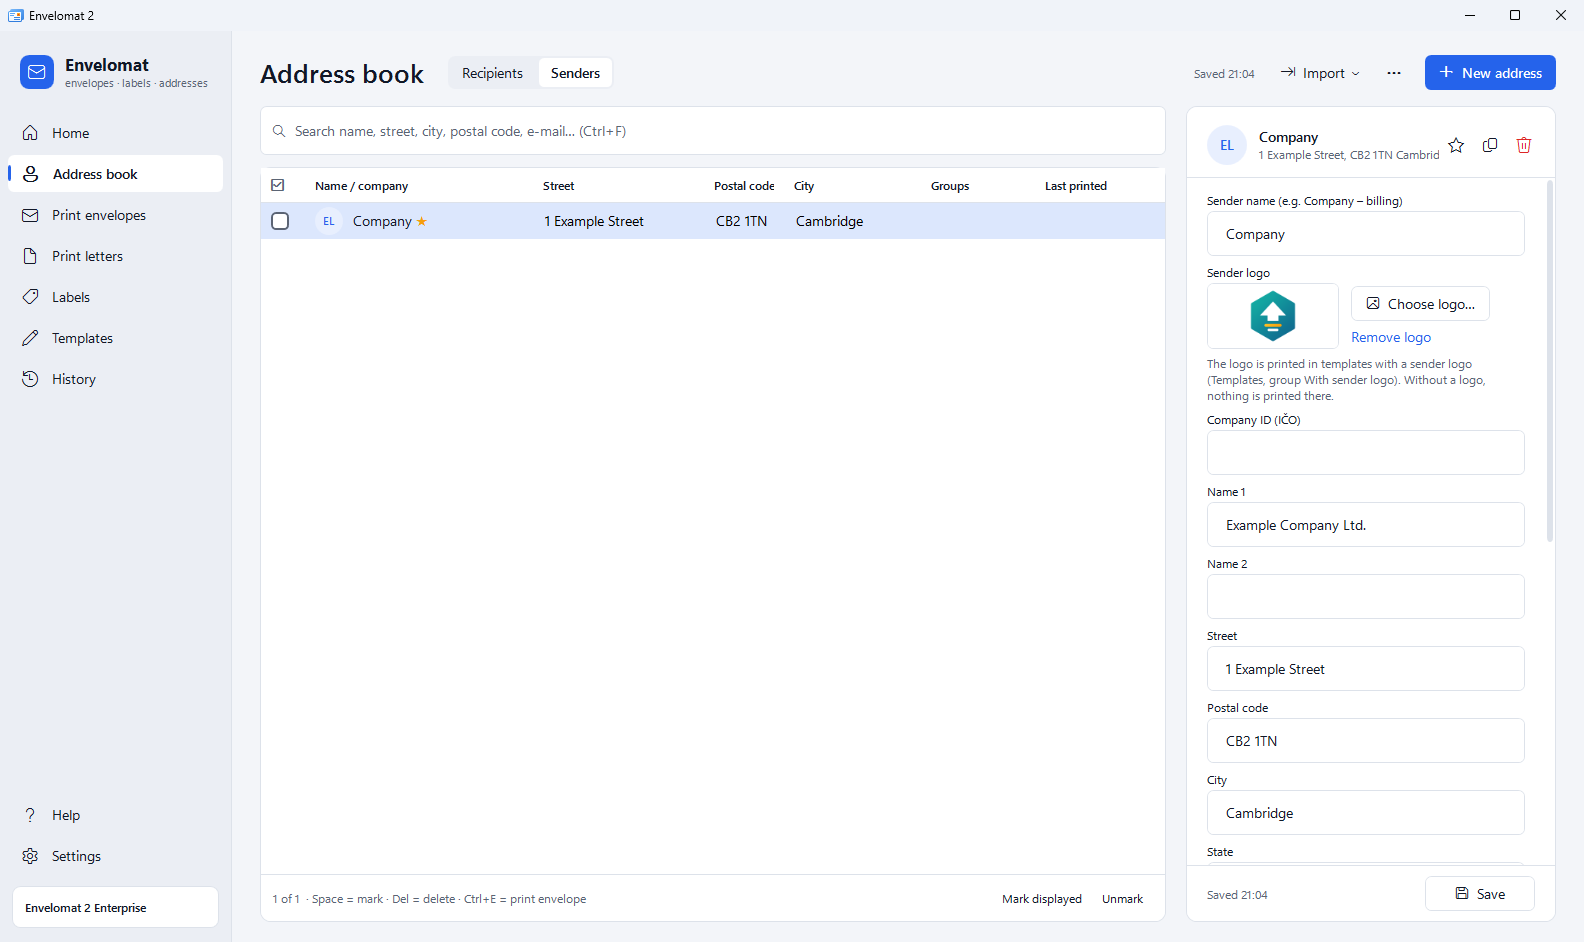
- In Print envelopes type QR into the search. The group With QR code offers DL and C5 envelopes: with QR code – website (with the text “More about us – scan the QR code”), with QR code – sender contact (a contact card from the address of the chosen sender – phones offer to save it) and with returned mail QR code.
- The website template contains the sample address https://www.example.com – in Templates click Edit a copy and replace it with your website in the QR code properties.
- The returned mail QR code carries the code of the envelope; a returned envelope is then simply scanned in ⋯ → Returned mail… in the Address book.
- For letters there is Letter A4 with QR code – contact in Print letters, and Labels have two formats with a QR code (24 labels 70 × 37 mm and 12 labels 105 × 48 mm).
QR codes are printed in the Enterprise edition and in the trial. In the Basic edition everything else is printed, the QR code space stays empty and before printing the program offers Print without QR code.
Your own envelope with an image or QR code
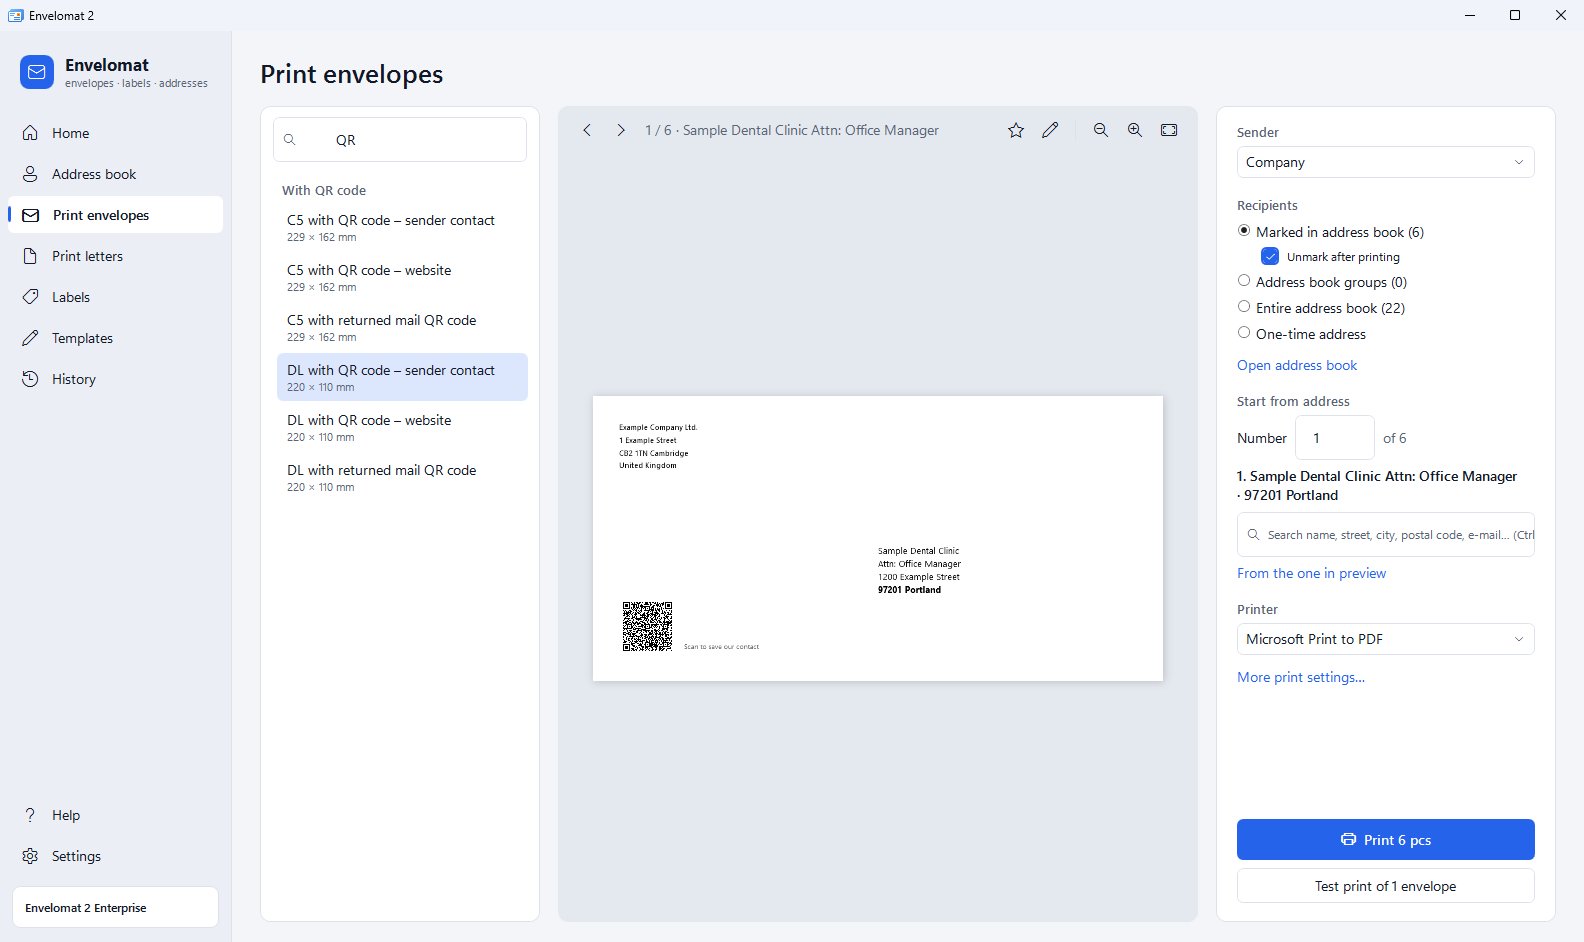
- In Templates select a template and click Edit a copy (supplied templates stay unchanged) or New and choose the envelope size.
- From the toolbar add an address Field, fixed Text, Logo ▾ (the sender logo or Image from file…) or a QR code (Enterprise). Move elements with the mouse and resize them with the handles; the rulers are in millimetres.
- Image as the envelope background: insert Logo ▾ → Image from file…, click As background and switch on Fill the whole frame. Set text on a dark background to white.
- Mark the template with the star as a favourite – it will be at the top of the list when printing.
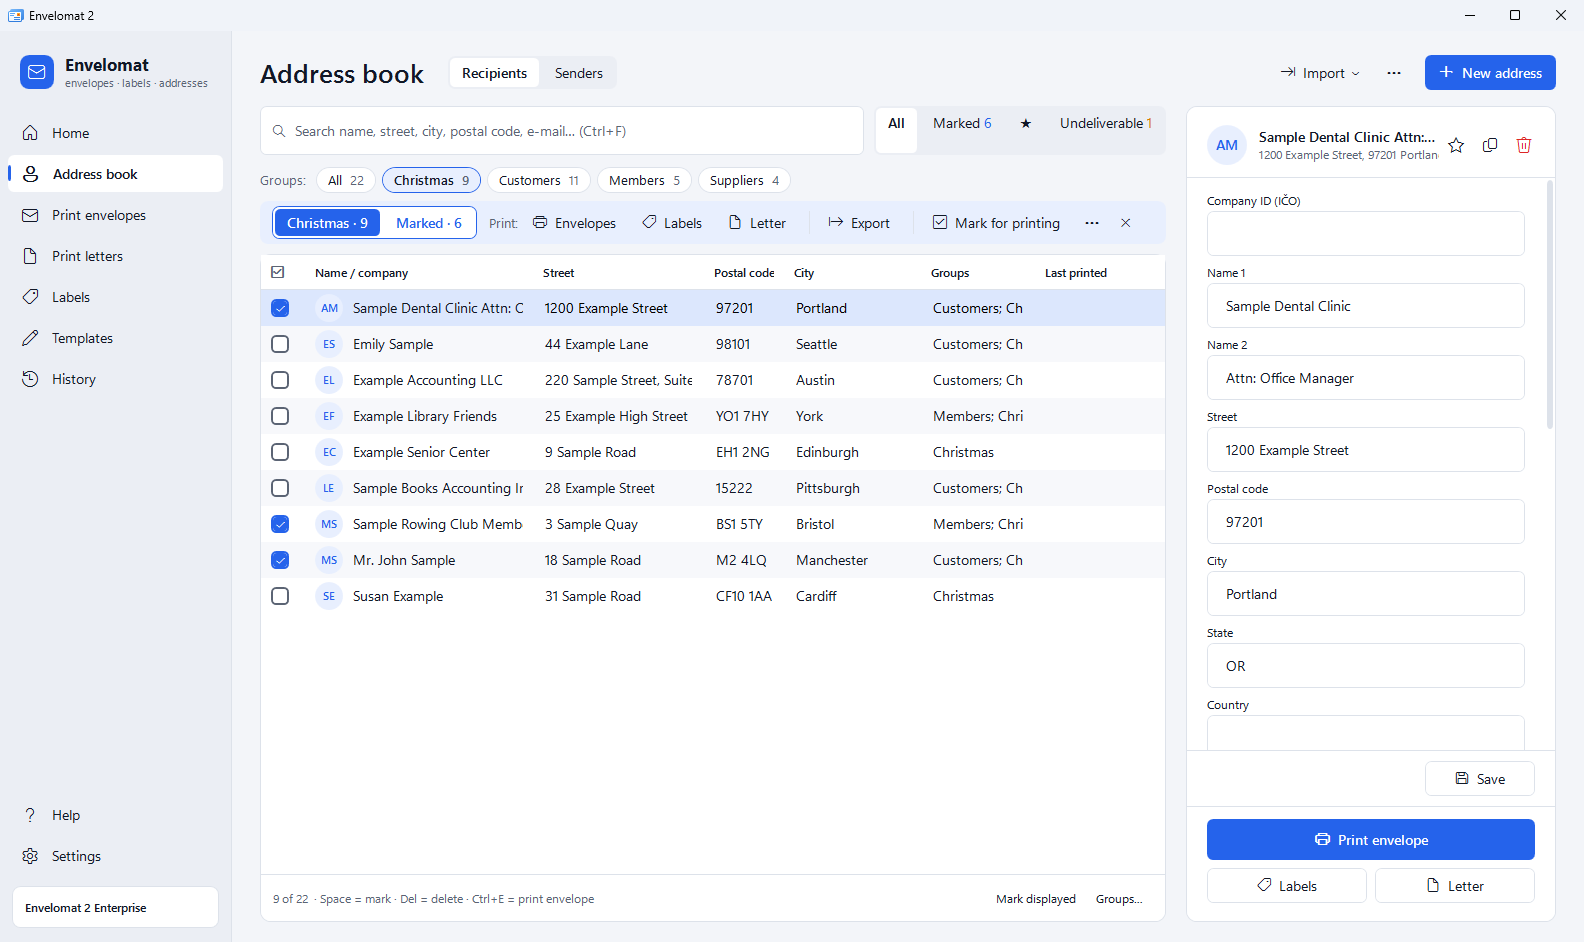
Address groups and continuing an interrupted print
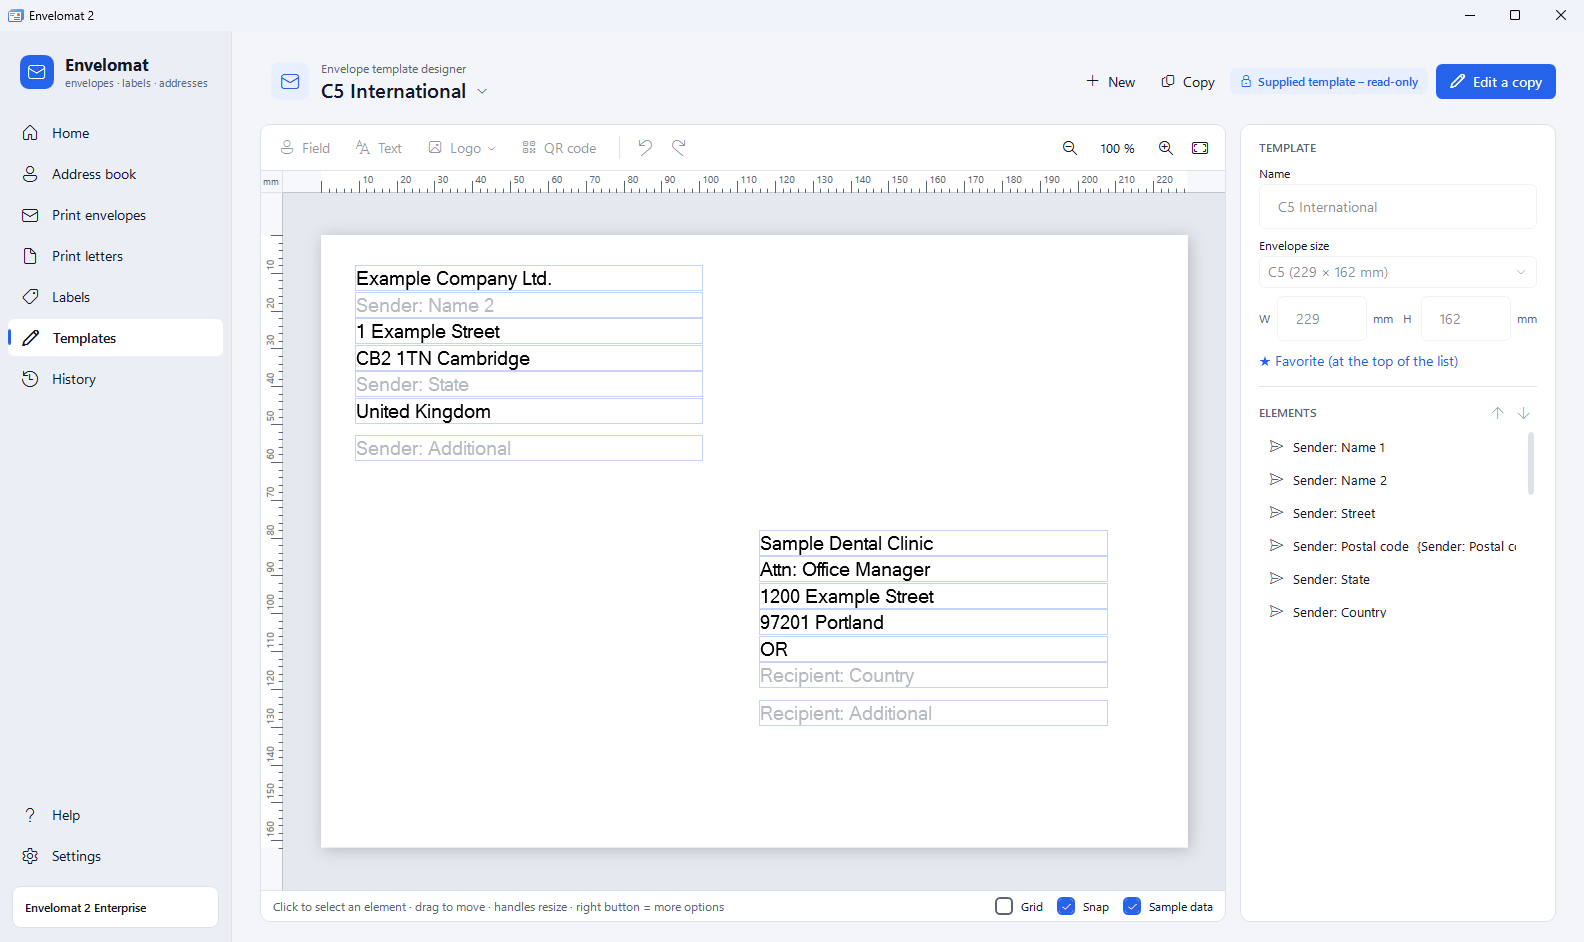
- Put an address into one or more groups in the Groups field of the address editor, or for many addresses at once with Groups… below the list.
- Click a group in the Groups bar to show its addresses; the blue strip above the list offers Print: Envelopes · Labels · Letter and Export (CSV for Excel) for the whole group. With several groups choose In any or In all.
- When you mark addresses (tick box or space bar), switch the toggle at the start of the strip to Marked – printing and export then use only the marked addresses.
- If printing stops (paper jam), open History and choose Continue from… at the last job – Envelomat prints the rest in the original order. When printing you can also set Start from address (sequence number or search).
Users and permissions (Enterprise)
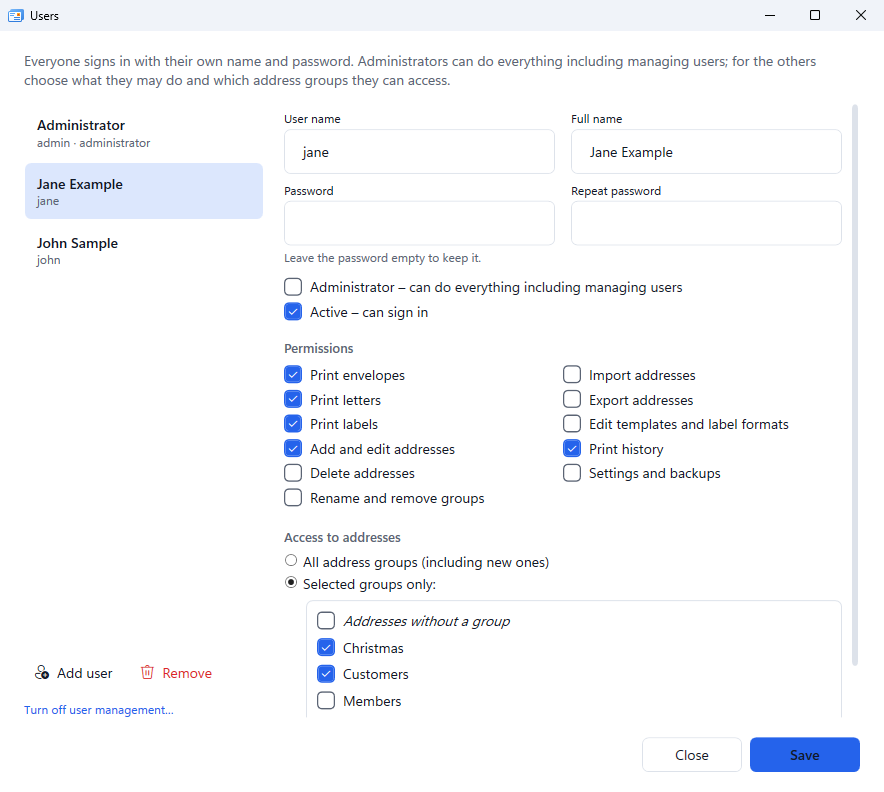
- In Settings click Turn on user management… The first account is the administrator – enter a password. Envelomat shows a password recovery code; write it down.
- In the Users window click Add user, enter a name and password and tick what the user may do: print envelopes, letters and labels, edit and delete addresses, groups, import, export, templates, history, settings.
- Under Access to addresses you can allow selected groups only – the colleague then sees only these addresses in the address book and when printing.
- After a restart everybody signs in with their own name and password (automatic sign-in on their own computer is possible). The print history shows who printed.
Without user management Envelomat never asks for a sign-in. The feature is part of the Enterprise edition and the trial.
Returned mail and undeliverable addresses
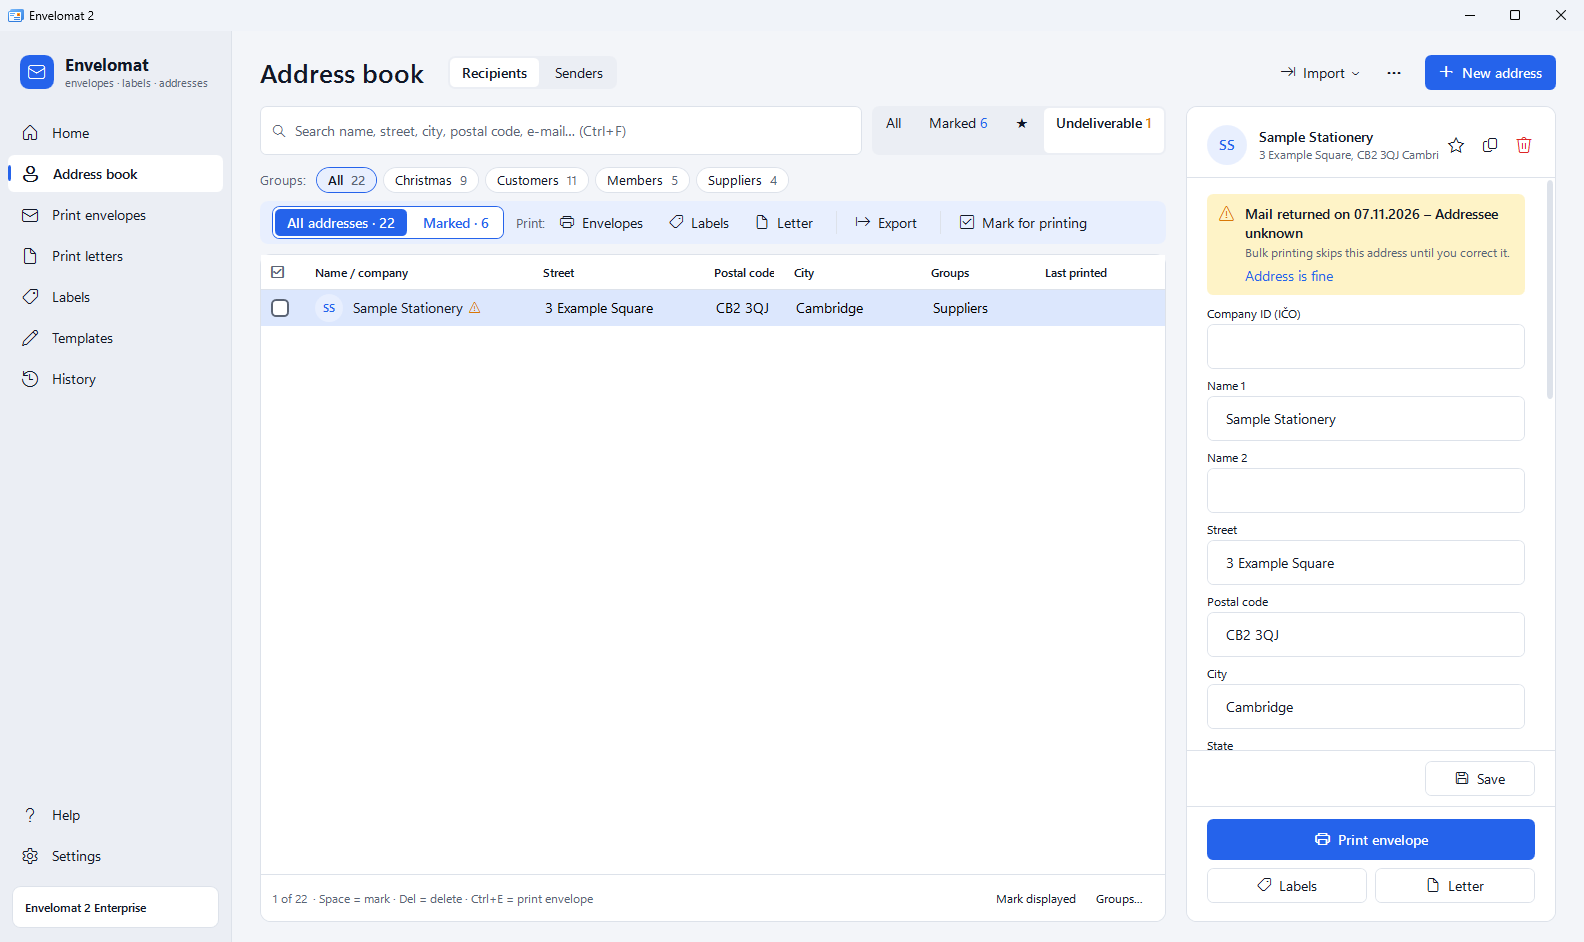
- When a letter comes back, open the address and tick Mail was returned (undeliverable address), optionally with a reason. A yellow bar appears above the editor and ⚠ in the list.
- The Undeliverable filter above the list shows all such addresses. Bulk printing (marked, groups, whole address book) skips them – Envelomat says so below the recipient selection.
- When you correct the address, the mark is removed automatically (or click Address is fine).
- For larger mailings insert the Code for returned mail field into the template (as text or a QR code). Then register returned envelopes in ⋯ → Returned mail… by scanning or typing the code.
Licence activation
- After payment we send you the licence key by e-mail.
- In the program open Settings → License and click Activate license key. Paste the key and confirm – the activation runs over the internet.
- The edition is shown at the bottom left (e.g. Envelomat 2 Enterprise). The watermark and trial limits disappear, your data stays.
No internet on the computer or the activation failed? See manual licence activation or contact us.
Frequently asked questions
Why does the printer print the address elsewhere than the preview shows?
Printers feed envelopes differently. Use Test print of 1 envelope and enter an offset in mm in More print settings. Also check that the envelope is inserted with the right side up and turned as shown on the printer.
How do I print one envelope without saving the address?
In Print envelopes choose the recipients One-time address, type the address and print. It is not saved to the address book.
Can I restore a deleted address?
Yes. Right after deleting click Undo. Older states can be restored from the automatic daily backup (Settings → Restore from backup…).
Try Envelomat 2 free for 30 days
Envelomat 2 for Windows 10 and Windows 11 (64-bit).